
Software security is an essential component of any enterprise or large scale software product. Making sure that your software product is secure protects your product from a range of attacks and helps safeguard the safety of your users’ data. Sometimes, it is even required due to laws and regulations of your industry.
In this tutorial, we will discuss how to use the dependency-check-maven plugin from OWASP to scan maven projects for known security vulnerabilities.
If you are looking to learn more about common security issues that appear in web applications and how to avoid them then I suggest that you check out the book “Web Application Security: Exploitation and Countermeasures for Modern Web Applications” by Andrew Hoffman (click to check reviews and price on Amazon). The book has been written by one of SalesForce’s senior security engineers and has been applauded for being a very useful and practical resource for those who strive to improve the security of their web applications.
About the OWASP Dependency-Check project
The OWASP (Open Web Application Security Project) Dependency-Check tool is an open source software composition analysis tool that attempts to scan your software project’s dependencies and compare them for known vulnerabilities. The tool makes use of the National Vulnerability Database (NVD) to find vulnerabilities that are known to affect your dependencies.
The tool comes in different flavors, each is able to scan different types of projects such as Maven projects, Gradle Projects etc.. In this tutorial, we will focus on the dependency-check-maven plugin to scan our Maven pom.xml file.
How to use the dependency-check-maven plugin
dependency-check-maven is a maven plugin that can be used to scan the dependencies in your pom.xml for known security vulnerabilities. The tool is quite useful since it automates a big part of your project’s security audit and will not only scan immediate dependencies, but also transitive ones.
The library will scan your project and produces a report which contains the analysis of individual JAR files which are included by your dependencies (either directly or transitively). If a vulnerability is found, then it will be highlighted in the report.
Let us start by adding the plugin to our example Spring boot project (note that this will work on any maven project, regardless of weather it is a Spring project or not). To make sure the plugin is installed, you will need to add it to the plugins section in the pom.
<plugin>
   <groupId>org.owasp</groupId>
   <artifactId>dependency-check-maven</artifactId>
   <version>6.1.1</version>
   <executions>
      <execution>
         <goals>
            <goal>check</goal>
         </goals>
      </execution>
   </executions>
</plugin>
Adding the plugin in this way will cause it to be triggered automatically during your maven build. The plugin execution is tied to the verify maven phase by default. The plugin can now be triggered by issuing a simple mvn install command. If everything is configured properly, then you will see logs similar to these in your build.
[INFO] — dependency-check-maven:6.1.1:check (default) @ springopenfeignexample —
[INFO] Checking for updates
[INFO] Download Started for NVD CVE – Modified
[INFO] Download Complete for NVD CVE – Modified (982 ms)
[INFO] Processing Started for NVD CVE – Modified
…….
One or more dependencies were identified with known vulnerabilities in demo:
spring-security-crypto-5.4.2.jar (pkg:maven/org.springframework.security/spring-security-crypto@5.4.2, cpe:2.3:a:pivotal_software:spring_security:5.4.2:::::::) : CVE-2018-1258 spring-security-rsa-1.0.9.RELEASE.jar (pkg:maven/org.springframework.security/spring-security-rsa@1.0.9.RELEASE, cpe:2.3:a:vmware:springsource_spring_security:1.0.9:release::::::*) : CVE-2011-2731, CVE-2011-2732, CVE-2012-5055
The first time the plugin is triggered might take a bit longer time (usually a few minutes). This is because the plugin downloads newer information from remotes sources regarding known vulnerabilities.
The project we use in this example has a small pom.xml file. In a production application, you might have dozens of dependencies. In this case, the dependency check can take a long time. So you might not want to trigger the dependency check everytime you build your application. In this case, it might be wise to remove the “Execution” from the plugin setup.
In this case, the plugin is simply configured as follows:
<plugin>
   <groupId>org.owasp</groupId>
   <artifactId>dependency-check-maven</artifactId>
   <version>${dependency-check-maven.version}</version>
</plugin>
To trigger the dependency check, you can issue the following command at the root of your project:
mvn dependency-check:check
This has the same effect as configuring the execution of the “check” goal, but has the benefit that it is triggered only when it is needed.
The vulnerability report
Once the plugin is done analyzing your project, it will create a report in your project’s target folder called “dependency-check-report.html“. Let us check how the report looks like.
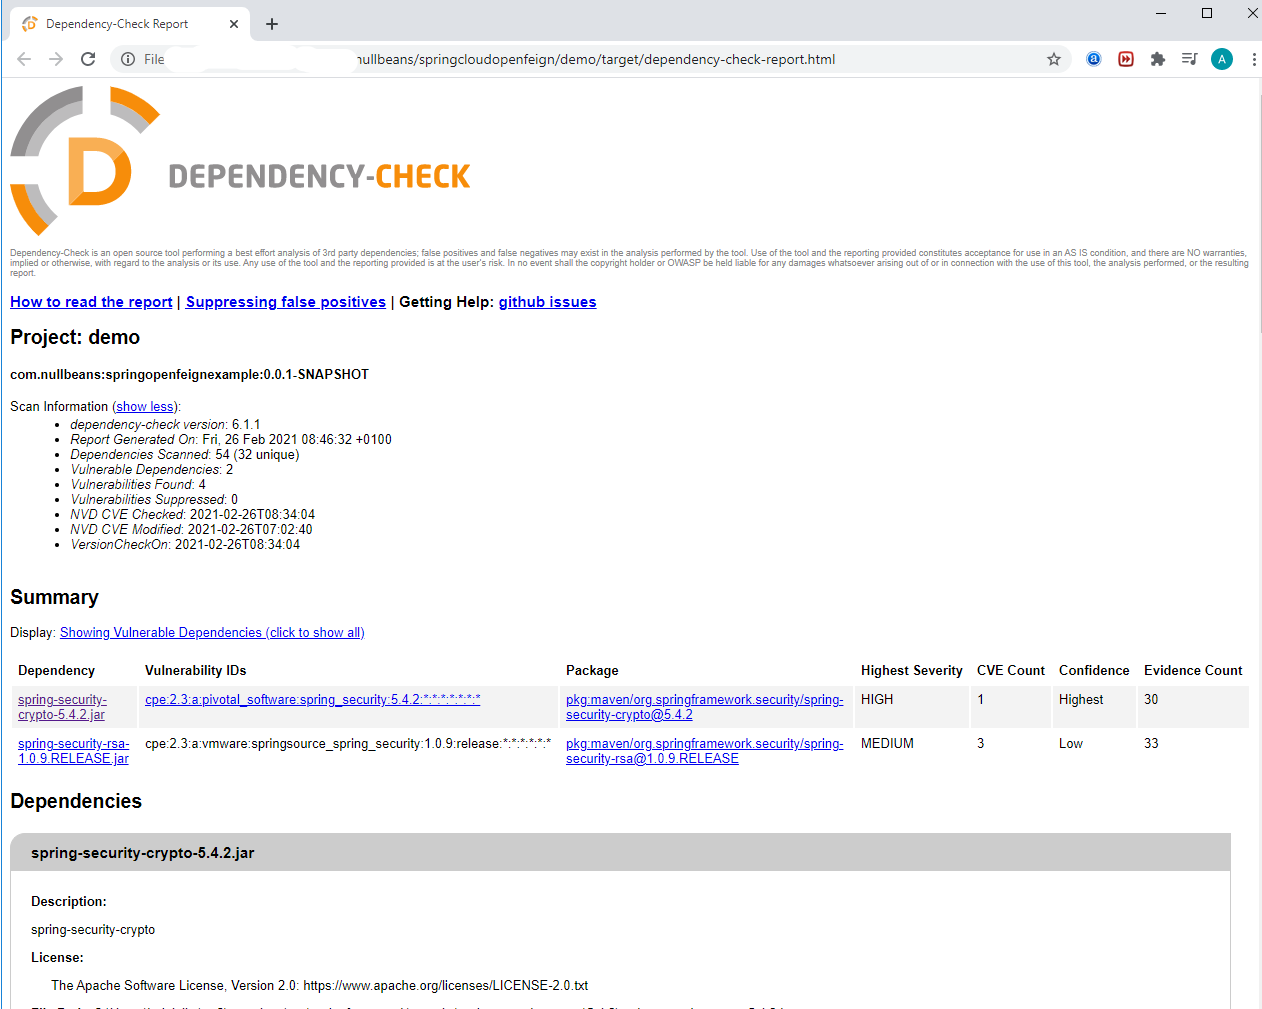
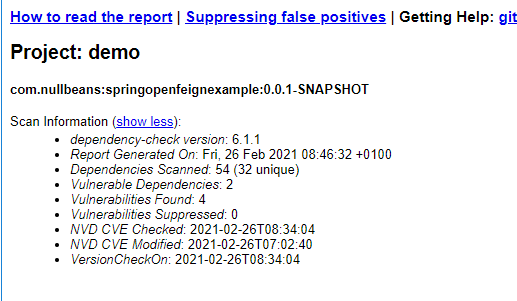
The report consists of three sections. First is the project scan information. This provides you with metadata regarding your project and the scan results such as the total number of scanned dependencies, the plugin version, the number of vulnerabilities found, etc.
The second part of the report contains a summary of the vulnerabilities found in your project.

The summary lists the individual JARs which are linked to known security vulnerabilities, the number of vulnerability entries found and the severity of the vulnerabilities found in the JAR.
If you scroll down through the report, you will see detailed information regarding each CVE (Common Vulnerabilities and Exposures) per library, detailed information about the vulnerability score (severity) and available references related to the vulnerability.
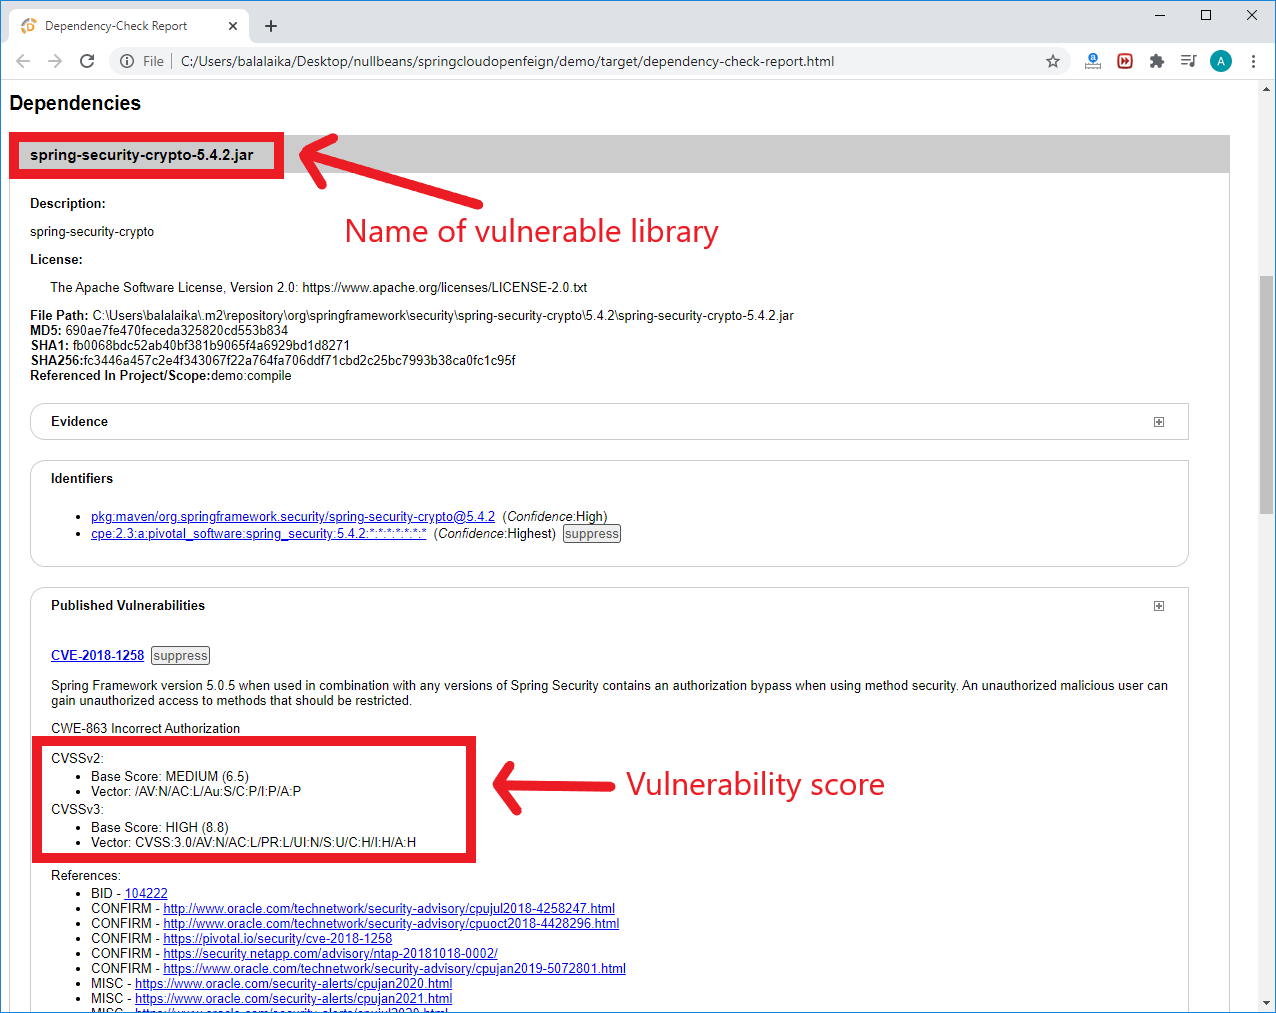
In the previous screenshot, the report indicates that our pom file contains a “High” severity vulnerability because of the library “spring-security-crypto” with version 5.4.2.
By reading through the report, you get to learn about the potential issues that could face your product and the troublesome libraries that might compromise the security of your product. Depending on your project and the vulnerability, you might need to take appropriate action such as upgrading the vulnerable library to a secure version or to replace the vulnerable library with a secure alternative.
Linking a vulnerability to the corresponding maven dependency
One of the limitations of the OWASP vulnerability report is that it does not indicate which dependency in your pom.xml file is directly responsible for pulling in the vulnerable JAR and with it the security vulnerability. However, this can be achieved by creating the project’s Maven dependeny tree to link the vulnerable JAR to a specific dependency.
For example, the previous report indicated that the jar file “spring-security-crypto-5.4.2.jar” contains a security bug. To find responsible maven dependency, we can build the dependency tree by issuing the following command at the root of the project:
mvn dependency:tree
This will produce a dependency tree showing each dependency, it’s corresponding transitive dependencies, and finally the libraries that are pulled into your project. It is recommended that you pipe the output of the dependency tree command into a text file so you can easily search through it later.
mvn dependency:tree >> output.txt
The output file will look something similar to this:
[INFO] Scanning for projects…
[INFO]
[INFO] --------------------< com.nullbeans:RestKotlinDemo >--------------------
[INFO] Building RestKotlinDemo 0.0.1-SNAPSHOT
[INFO] --------------------------------[ jar ]---------------------------------
[INFO]
[INFO] --- maven-dependency-plugin:3.1.2:tree (default-cli) @ RestKotlinDemo ---
[INFO] com.nullbeans:RestKotlinDemo:jar:0.0.1-SNAPSHOT
[INFO] +- org.springframework.boot:spring-boot-starter-web:jar:2.4.2:compile
[INFO] | +- org.springframework.boot:spring-boot-starter:jar:2.4.2:compile
[INFO] | | +- org.springframework.boot:spring-boot:jar:2.4.2:compile
[INFO] | | +- org.springframework.boot:spring-boot-autoconfigure:jar:2.4.2:compile
[INFO] | | +- jakarta.annotation:jakarta.annotation-api:jar:1.3.5:compile
[INFO] | | - org.yaml:snakeyaml:jar:1.27:compile
[INFO] | +- org.springframework.boot:spring-boot-starter-json:jar:2.4.2:compile
[INFO] | | +- com.fasterxml.jackson.datatype:jackson-datatype-jdk8:jar:2.11.4:compile
Now, let us search our dependency tree to find the vulnerable jar.
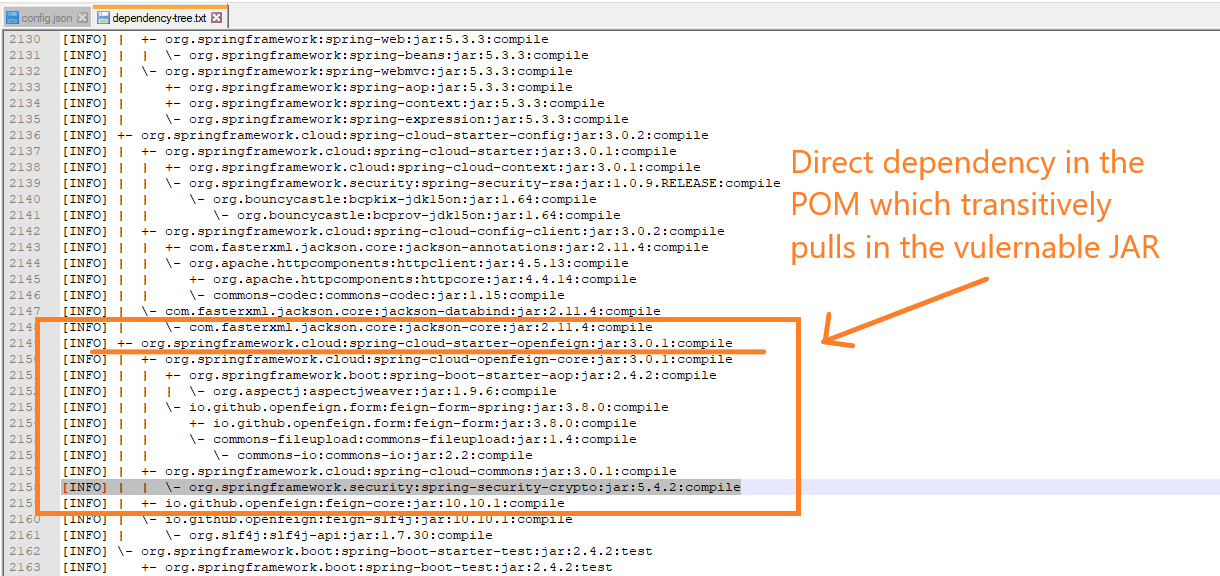
In our example, we find out that the vulnerable JAR is transitively included via the direct dependency spring-cloud-starter-openfeign which is included in our pom.xml. Once you find out which dependency is responsible for the security bug, you will need to decide the correct action to take.
Suppressing false positives
Sometimes, the vulnerability report will include issues which might not really affect your project or might not actually be true. Those vulnerability warnings are called false positives. Therefore, it is sometimes useful to instruct the dependency-check-plugin to suppress (omit) those security vulnerabilities from the report. This will help keep your report clean and allow your team to focus on issues which actually matter.
To do so, we will need to create a suppression file which will be considered by the plugin during the vulnerability scan. The suppression file has an XML format. Therefore, let us begin by creating an empty xml file somewhere in our project. Once the file is created, you will need to configure the plugin to include the file as follows.
<plugin>
   <groupId>org.owasp</groupId>
   <artifactId>dependency-check-maven</artifactId>
   <version>${dependency-check-maven.version}</version>
   <configuration>
      <suppressionFiles>
         <suppressionFile>./src/main/resources/dependency-check-suppressions.xml</suppressionFile>
      </suppressionFiles>
   </configuration>
</plugin>
Notice that you can add multiple suppression files. All files will be considered while performing the scan. Also note that you can also include files which exist remote locations (for example: https://example.com/my-suppressionfile.xml). Now, let us populate the contents of that xml file.
Notice that next to each vulnerability in the report, there exists a “suppress” button. This button can be used to generate the corresponding suppression code to be inserted into the suppressions XML file and suppress the mentioned vulnerability.
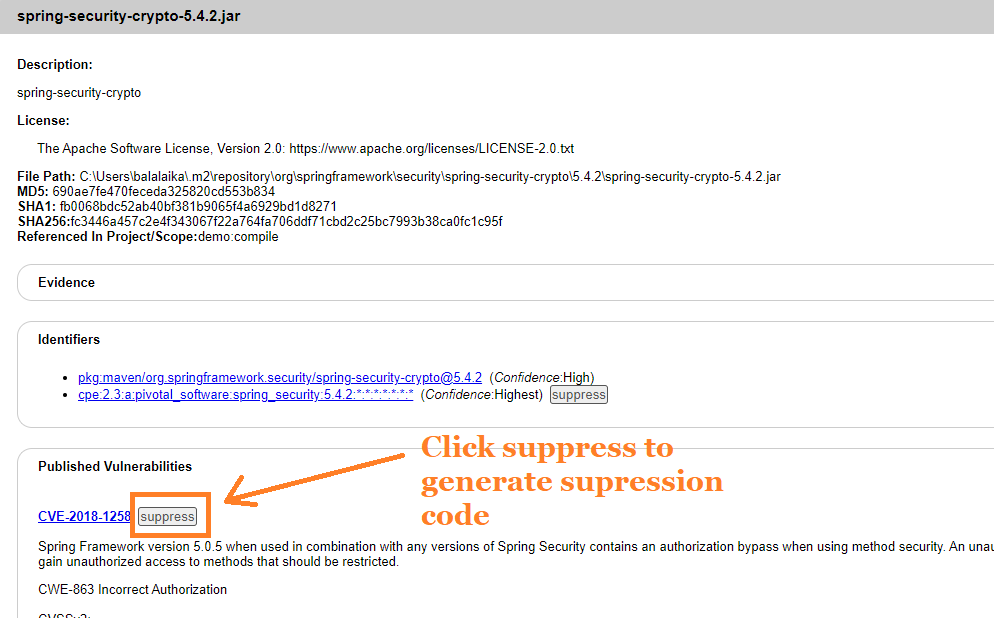
When you click the suppress button, you also have the option to generate the code for the complete suppression xml document. This is particularly useful if you are starting a suppression XML file from scratch.

Once you add the suppression code to your configured suppressions file, the vulnerability will be omitted from the report in the next scan. Here is an example of a complete suppression file:
<?xml version="1.0" encoding="UTF-8"?>
<suppressions xmlns="https://jeremylong.github.io/DependencyCheck/dependency-suppression.1.3.xsd">
    <suppress>
        <notes><![CDATA[
      file name: spring-security-crypto-5.4.2.jar
      ]]></notes>
        <packageUrl regex="true">^pkg:maven/org\.springframework\.security/spring\-security\-crypto@.*$</packageUrl>
        <cpe>cpe:/a:pivotal_software:spring_security</cpe>
    </suppress>
    <suppress>
        <notes><![CDATA[
   file name: spring-security-rsa-1.0.9.RELEASE.jar
   ]]></notes>
        <packageUrl regex="true">^pkg:maven/org\.springframework\.security/spring\-security\-rsa@.*$</packageUrl>
        <cve>CVE-2011-2731</cve>
    </suppress>
</suppressions>
Scanning multi-module maven projects
If your project consists of multiple modules, then you can generate one single report for all submodules by using the dependency-check plugin’s “aggregate” goal. You can issue the command at the parent project as follows:
mvn dependency-check:aggregate
This will produce the report in the parent project’s target folder. However, I find this approach has several limitations:
- The report is aggregated. Therefore, it is hard to tell from which module a vulnerability comes from.
- I find the number of vulnerabilities counted this way is a bit over bloated. For example, if you have dependencies between your different maven modules, then those vulnerabilities are counted twice.
- Vulnerabilities that exist in non-deployable modules (for example, in your test modules) are also included in the report.
A better strategy might be to focus the analysis on modules which are actually deployed on the production environment and to perform the analysis on each of those modules individually as the same vulnerability can affect different deployables and microservices differently.
This is not to say that we don’t need to evaluate all security vulnerabilities. But it is better to prioritize issues in production artifacts than test or unused artifacts.
Final remarks and summary
In this tutorial we discussed how to use the dependency-check-maven plugin to scan maven projects for security vulnerabilities. We also discussed how to perform analysis across multimodule maven projects and how to configure suppression files to suppress false positives from our vulnerability reports.
It is important to highlight that it is crucial to keep the dependency-check plugin itself up to date and to the latest version. This is because the team responsible for the plugin continuously improves the scanning mechanism of the plugin and also maintain and update a list of false positives themselves. This list gets updated with almost every release of the plugin.
Finally, it is important to realize that this plugin is not the end all be all. The audit performed by this tool should be used in combination with other auditing tools, methods, knowledge and common sense to have a stable and secure product.
Thanks for reading 🙂