
In our previous tutorial, we discussed how to configure the OWASP dependency-check maven plugin to analyze maven projects for vulnerable dependencies. The dependency check report provides a detailed report of vulnerable JAR libraries used in your project.
In this tutorial, we discuss how to integrate the dependency check report into your Sonar analysis and your SonarQube project. This gives you the advantage of having code analysis and dependency audit results in one place and allows us to have a more complete evaluation of the overall health of the project.
Enable dependency check in SonarQube
In order to integrate the results of the dependency-check-maven plugin into the SonarQube project report, we will first have to configure SonarQube to accept the dependency check reports.
For this, we will need to install the Dependency-Check plugin on the SonarQube server. You will need to have administrative access to SonarQube in order to perform the following steps:
- Login to SonarQube as an administrator.
- Go to the “Administration” tab
- Go to the “Marketplace” tab
- In the plugins section, search for “Dependency-check”
- Click install

Once the plugin has been installed, you will need to restart the SonarQube server for the plugin to be activated.
If you prefer not to use the Marketplace, then you could download the plugin JAR file manually from the plugin’s Github repository and copy it to the SonarQube plugin’s folder on the server. The folder location depends on the version of SonarQube you use. You can follow the manual installation guide instructions from the official SonarQube documentation here.
Once the plugin has been installed correctly and the server has been restarted, you will find that there is a new tab in each of your projects on SonarQube called “More”, where you will find the “Dependency-Check” info.

Configuring your project to upload dependency-check reports to SonarQube
Once that the SonarQube server is ready to receive the dependency-check information, it is time to configure Sonar in our project to upload the dependency-check report to the SonarQube server.
To keep things simple, we will keep our Sonar configuration for this example very minimal. We will be using maven in this tutorial, but the properties that will be used in this post apply to other project types and CI/CD systems.
Enable both HTML and JSON dependency-check report formats
In order for SonarQube to accept the dependency check results, we will need to upload them in two different formats, namely HTML and JSON. The HTML report is the default report that is generated by the plugin and it is useful for human reading. On the other hand, the JSON format is necessary to gather and analyze results and statistics in SonarQube.
So let us instruct the dependency-check-maven plugin to generate the results in both HTML and JSON formats.
<plugin>
   <groupId>org.owasp</groupId>
   <artifactId>dependency-check-maven</artifactId>
   <version>${dependency-check-maven.version}</version>
   <configuration>
      <formats>
         <format>html</format>
         <format>json</format>
      </formats>
   </configuration>
</plugin>
Configure the sonar-maven-plugin
The next step is to install the sonar-maven-plugin in our maven project in the pom.xml. Here, we add the plugin declaration in the “plugins” section of the pom.xml file.
<plugin>
   <groupId>org.sonarsource.scanner.maven</groupId>
   <artifactId>sonar-maven-plugin</artifactId>
   <version>3.8.0.2131</version>
</plugin>
This installs the sonar plugin into your project. However, we will also need to tell Sonar where our SonarQube server is and where the dependency check reports are located. To achieve this, we will need to configure the following properties:
- sonar.dependencyCheck.htmlReportPath : indicates the location of the dependency-check HTML report.
- sonar.dependencyCheck.jsonReportPath : indicates the location of the dependency-check JSON report.
- sonar.host.url : indicates the location of the SonarQube server.
- java.version : it is important to set this property as it is used by many plugins and depending on your maven and JDK version, Sonar might throw some errors if it is missing.
Below you can find the maven properties of our test project:
<properties>
   <java.version>11</java.version>
   <dependency-check-maven.version>6.1.1</dependency-check-maven.version>
   <sonar.dependencyCheck.htmlReportPath>./target/dependency-check-report.html</sonar.dependencyCheck.htmlReportPath>
   <sonar.dependencyCheck.jsonReportPath>./target/dependency-check-report.json</sonar.dependencyCheck.jsonReportPath>
   <sonar.dependencyCheck.summarize>true</sonar.dependencyCheck.summarize>
   <sonar.host.url>http://localhost:9000/</sonar.host.url>
</properties>
Running the dependency-check plugin
As we have seen in our previous tutorial, the dependency-check-maven plugin can be triggered as follows:
mvn dependency-check:check
This will trigger the audit of the project’s dependencies and create the audit report in whichever formats you have configured (in our case HTML and JSON). By default, the reports will be placed in the project’s target folder with the names dependency-check-report.html and dependency-check-report.json.
Performing the Sonar analysis and uploading the reports to SonarQube
Once you have the dependency-check reports ready, it is time to trigger the Sonar plugin to perform an audit of your project’s code and to upload the dependency check reports along with the sonar analysis results to the SonarQube server.
This can be done by issuing the following command:
mvn sonar:sonar
If everything has been configured correctly, then you will see logs similar to those ones:
[INFO] --- sonar-maven-plugin:3.8.0.2131:sonar (default-cli) @ springopenfeignexample ---
[INFO] User cache: C:\Users\user.sonar\cache
[INFO] SonarQube version: 8.2.0
[INFO] Default locale: "en_US", source code encoding: "UTF-8"
[INFO] Load global settings
[INFO] Load global settings (done) | time=82ms
You will also find similar logs indicating that the dependency check reports have been processed by Sonar.
[INFO] ------------- Run sensors on project
[INFO] Sensor Dependency-Check [dependencycheck]
[INFO] Process Dependency-Check report
[INFO] Using JSON-Reportparser
[INFO] Linking 32 dependencies
[INFO] Upload Dependency-Check HTML-Report
[INFO] Process Dependency-Check report (done) | time=492ms
Viewing the dependency-check results in SonarQube
Now let us check how the audit results look like when viewed on SonarQube. For this, please go to your project page in SonarQube.
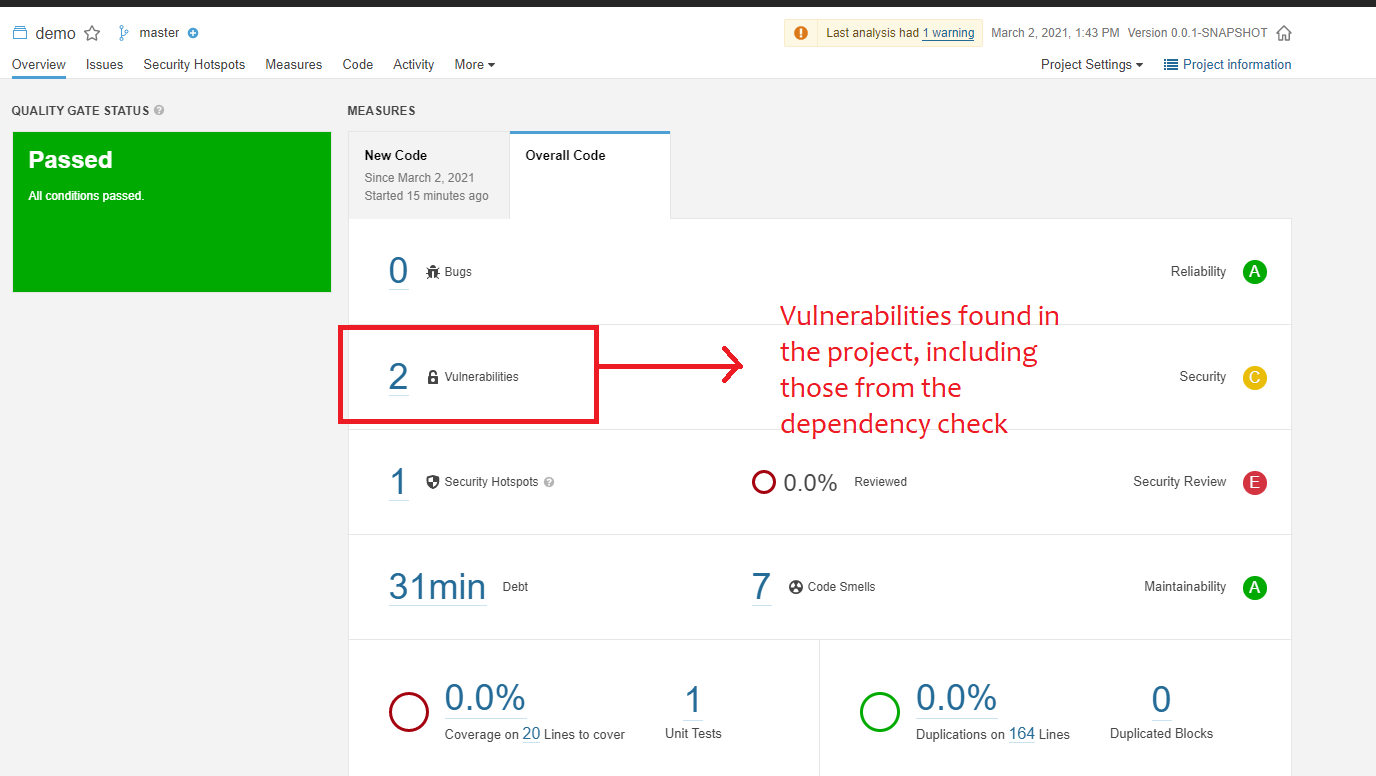
When you view your project’s overall health score, you will find that count of security vulnerabilities found during the dependency check are included in the overall vulnerabilities count of the project.

If you click on the vulnerabilities count, you will be redirected to the filter details page where you can see the number of vulnerabilities in your project, grouped by severity. This is useful as high severity issues can be filtered for and evaluated first.
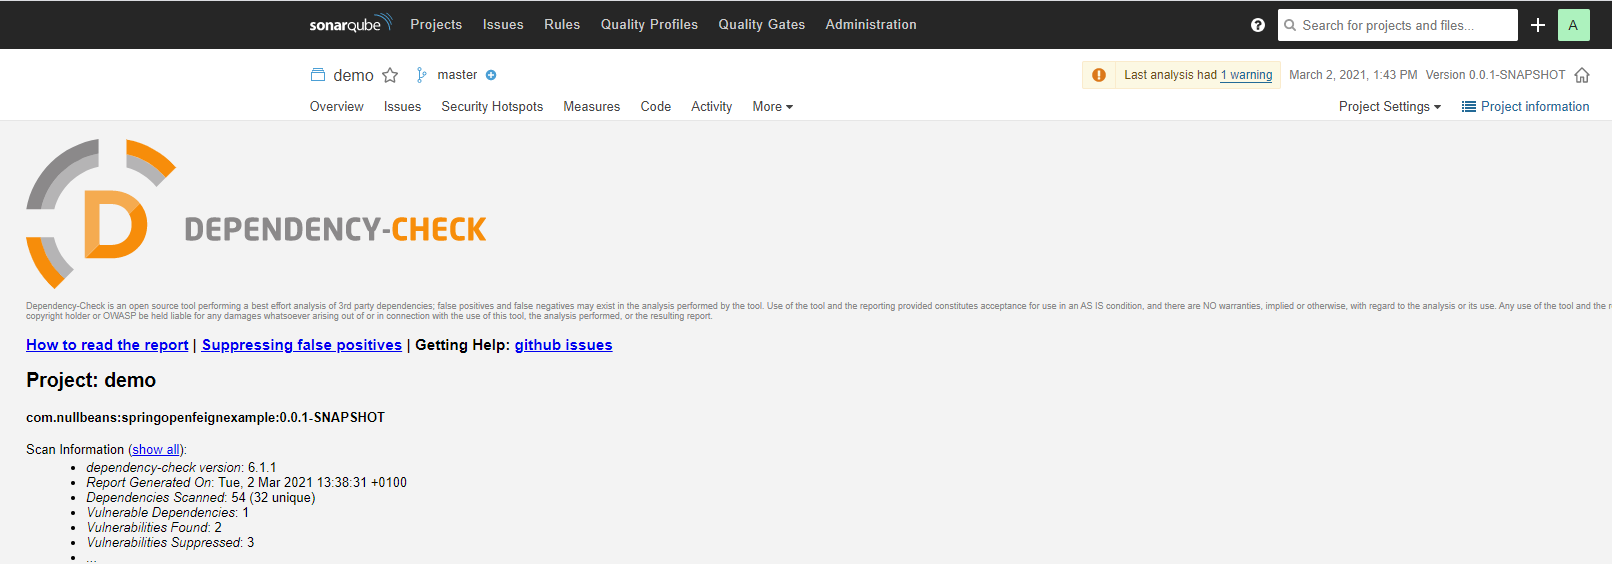
You can also view the original dependency check report by going to the “more” tab and clicking on “dependency-check”.
Summary
In this tutorial, we discussed how to configure SonarQube to accept dependency-check reports. We also discussed how to configured the dependency-check-maven plugin to scan and create reports that can be uploaded to SonarQube and included in the overall Sonar analysis results.
Thank you for reading and have a great day!