In this post, we will configure a Spring boot application to use a MongoDB persistence back-end. BTW, if you are developing on a Windows machine, then you can also check out our guide for how to install and get started with MongoDB on Windows.
Introduction
MongoDB is a NoSQL, cross-platform, document based database engine. It was initially released in 2009 but has been increasingly popular over the years thanks to its scalability and increasing popularity of NoSQL database systems.
Unlike traditional relational database systems such as Postgres and Oracle, MongoDB like other NoSQL systems does not have relationships among entities. MongoDB uses documents and embedded/nested documents to map a “relationship” between two entities. Each document is written in JSON format, and a database “table”, for example, “users” is a collection of documents.
Combining the power of MongoDB and Spring-Data along with the ease of development of Spring boot provides a really powerful development stack. So let us get started up by defining the dependencies in our POM file.
In our example, we will be using Spring boot 2.1.4, MongoDB 4.0.8 and JDK 8.
Adding the required dependencies
In order to make use of MongoDB within a Spring boot application, you will need two dependencies. First is the spring-data dependency which provides us the data management API from Spring, and the second is spring-boot-starter-data-mongodb which is needed to include the MongoDB driver and other MongoDB support libraries. Since our module will use the spring-boot-starter-parent, we only need to explicitly add the spring-boot-starter-data-mongodb. The starter parent should take care of spring-data. Our POM xml will look as follows.
<?xml version="1.0" encoding="UTF-8"?>
<project xmlns="http://maven.apache.org/POM/4.0.0" xmlns:xsi="http://www.w3.org/2001/XMLSchema-instance"
	xsi:schemaLocation="http://maven.apache.org/POM/4.0.0 http://maven.apache.org/xsd/maven-4.0.0.xsd">
	<modelVersion>4.0.0</modelVersion>
	<parent>
		<groupId>org.springframework.boot</groupId>
		<artifactId>spring-boot-starter-parent</artifactId>
		<version>2.1.4.RELEASE</version>
		<relativePath/> <!-- lookup parent from repository -->
	</parent>
	<groupId>com.nullbeans</groupId>
	<artifactId>mongodbexample</artifactId>
	<version>0.0.1-SNAPSHOT</version>
	<name>mongodbexample</name>
	<description>Demo project for Spring Boot</description>

	<properties>
		<java.version>1.8</java.version>
	</properties>

	<dependencies>
		<dependency>
			<groupId>org.springframework.boot</groupId>
			<artifactId>spring-boot-starter</artifactId>
		</dependency>

		<dependency>
			<groupId>org.springframework.boot</groupId>
			<artifactId>spring-boot-starter-data-mongodb</artifactId>
		</dependency>

		<dependency>
			<groupId>org.springframework.boot</groupId>
			<artifactId>spring-boot-starter-test</artifactId>
			<scope>test</scope>
		</dependency>
	</dependencies>

	<build>
		<plugins>
			<plugin>
				<groupId>org.springframework.boot</groupId>
				<artifactId>spring-boot-maven-plugin</artifactId>
			</plugin>
		</plugins>
	</build>

</project>
Configuring connectivity and authentication to the MongoDB server
The next step is to make sure our application can find the MongoDB server and connect to it with the correct user on the correct database. For this, we will need to configure the connection properties in the application.properties file. There are two methods to configuring the connectivity. First is to define each connection property such as the username, password, host, etc.. separately. This can be done as follows:
spring.data.mongodb.host=localhost
spring.data.mongodb.port=27017
spring.data.mongodb.database=nullbeans
spring.data.mongodb.username=myusername
spring.data.mongodb.password=mypassword
The second option is to build a connection URI.
spring.data.mongodb.uri=mongodb://myusername:mypassword@localhost:27017/nullbeans
Please note that if you are logging in with a database superuser inside the Mongo admin database, then you will need to define the authentication-database property.
spring.data.mongodb.authentication-database=admin
If your user was created directly on the required database, then the authentication-database property is not necessary.
Creating an entity model
The nice thing about MongoDB is that it is a document based engine. Therefore, when creating a new entity model on the application side, there are no schema changes required on the database side. You can simply create a new entity model or modify an existing one and get on with it.
So let us start by creating our entity class. Our entity will be a “Car”, with only a few fields as follows:
package com.nullbeans.persistence.models;

import org.springframework.data.annotation.Id;

public class Car {

    //marking this as the id field
    @Id
    public String id;

    public String brand;

    public String year;

    public String model;

    public int horsePower;


    public Car(){

    }


    public Car(String brand, String year, String model, int horsePower) {
        this.brand = brand;
        this.year = year;
        this.model = model;
        this.horsePower = horsePower;
    }

    public String getId() {
        return id;
    }

    public void setId(String id) {
        this.id = id;
    }

    public String getBrand() {
        return brand;
    }

    ... getters and setters continue.....

    @Override
    public String toString() {
        return "Car{" +
                "id='" + id + '\'' +
                ", brand='" + brand + '\'' +
                ", year='" + year + '\'' +
                ", model='" + model + '\'' +
                ", horsePower=" + horsePower +
                '}';
    }
}
Notice that the only annotation required here is the @Id annotation, which tells spring data where to populate the id field that is generated from the database engine.
Creating a MongoDB CRUD Repository
In order to be able to perform read/write operations on our Car entity, we will need to create a repository for it. The spring-data-mongodb library provides us with a MongoRepository interface that allows us to perform CRUD operations such as findAll, save or delete. The interface is a good starting point for creating repositories for your MongoDB entities as it gets you up and running in a short amount of time.
Let us define our “CarRepository” along with two search methods. The first will search for cars with a specific model. The second will search for cars with a horse power value that is less than the search parameter. In order to do this, we will need to create the CarRepository as an interface and extend the MongoRepository interface.
package com.nullbeans.persistence.repositories;

import com.nullbeans.persistence.models.Car;
import org.springframework.data.mongodb.repository.MongoRepository;
import org.springframework.data.mongodb.repository.Query;

import java.util.List;

public interface CarRepository extends MongoRepository<Car, String> {


    public Car findByModel(String model);

    @Query("{'horsePower': {$lt: ?0}}")
    public List<Car> findCarsWithHorsePowerLessThan(int horsePower);

}
Notice that for the first search method, all we need to do is to name the method and the search parameter with the actual required search parameter and spring-data takes care of the rest of the implementation.
Our second search function is a bit more interesting so let us break it down.
- @Query: This annotation exists in both spring-data and spring-data-mongodb. It indicates that the following function should perform the given query. In the case of MongoDB, we provide the query in the MongoDB query format, which is basically a JSON document.
- ‘horsePower’ : This is the name of the search parameter that we will use to search among the documents.
- $lt : This is short for “less than”. If we wanted to search for cars with a horse power value greater than our parameter, then we can use $gt .
Activating MongoDB repositories using @EnableMongoRepositories
In order for Spring to find our MongoDB repository, we need to indicate to Spring where they are located. We can do this by using the annotation @EnableMongoRepositories. If this is not done, then Spring boot will try to find your repositories by scanning packages and subpackages that exist where your application’s main class resides (the one with the @SpringBootApplication configuration).
It may be wise to explicitly state the repositories location as this is less error prone and also gives your code reader an idea of where to find your repositories. For this, we create a Java configuration class, with the annotation configured as follows.
package com.nullbeans.persistence.config;

import org.springframework.data.mongodb.repository.config.EnableMongoRepositories;

@EnableMongoRepositories(basePackages = {"com.nullbeans.persistence.repositories"})
public class MongoDbConfig {

}
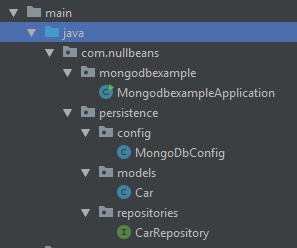
Notice that we scan the package and subpackages of “com.nullbeans.persistence.repositories”. You can also add the annotation without stating any base packages. In that case, Spring will detect the package of the class that has the @EnableMongoRepositories annotation , in this case “com.nullbeans.persistence.config” and try to scan that package and its sub directories. Please find the current package structure if things are starting to get confusing:
Testing our application
Now, let us put it all together by creating a simple Spring boot application in order to test the connectivity to the database. For this, we will create a simple subclass of Spring-boot’s command line runner.
@Import(MongoDbConfig.class)
@SpringBootApplication
public class MongodbexampleApplication implements CommandLineRunner {

	public static final Logger log = LoggerFactory.getLogger(MongodbexampleApplication.class);

	@Autowired
	private CarRepository carRepository;

	public static void main(String[] args) {
		SpringApplication.run(MongodbexampleApplication.class, args);
	}

	@Override
	public void run(String... args) throws Exception{

		//Clean the collection for our test
		carRepository.deleteAll();

		//create test data
		Car car1 = new Car("Ferrari", "2015", "488", 670);
		Car car2 = new Car("Fiat", "2012", "Abarth 595", 140);
		Car car3 = new Car("Fiat", "2007", "Abarth 500", 135);
		carRepository.save(car1);
		carRepository.save(car2);
		carRepository.save(car3);

		//find a car by model
		Car car488 = carRepository.findByModel("488");
		log.info("Car: {}", car2);

		//find cars with horse power less than 200
		List<Car> cars = carRepository.findCarsWithHorsePowerLessThan(200);

		//log the results
		log.info("Found the following cars");
		for (Car foundCar: cars){
			log.info(foundCar.toString());
		}

	}

}
Let us go through the run method step by step:
- carRepository.deleteAll() : This method comes from Spring-data. It allows us to delete all items in the given database table or in the case of MongoDB, the documents in the collection.
- carRepository.save(car1): This method will try to persist the object into the database.
- carRepository.findByModel(“488”): Here we call our custom method to search for cars with the model name “488”
- carRepository.findCarsWithHorsePowerLessThan(200): Here we call our 2nd custom method to search for cars with a horsePower value of less than 200.
If we run our program, we will get the following result:
 c.n.m.MongodbexampleApplication: Started MongodbexampleApplication in 2.131 seconds (JVM running for 2.539)
 org.mongodb.driver.connection: Opened connection [connectionId{localValue:2, serverValue:82}] to localhost:27017
 c.n.m.MongodbexampleApplication: Car: Car{id='5ca763446598432d3ccf2013', brand='Fiat', year='2012', model='Abarth 595', horsePower=140}
 c.n.m.MongodbexampleApplication: Found the following cars
 c.n.m.MongodbexampleApplication: Car{id='5ca763446598432d3ccf2013', brand='Fiat', year='2012', model='Abarth 595', horsePower=140}
 c.n.m.MongodbexampleApplication: Car{id='5ca763446598432d3ccf2014', brand='Fiat', year='2007', model='Abarth 500', horsePower=135}
 org.mongodb.driver.connection: Closed connection [connectionId{localValue:2, serverValue:82}] to localhost:27017 because the pool has been closed.
If we take a look at the MongoDB database, we will find the following the spring boot application created a collection called “car” in the “nullbeans” database. The collection has the following documents.
{"_id":"5ca763446598432d3ccf2012",
"brand":"Ferrari",
"year":"2015",
"model":"488",
"horsePower":670,
"_class":"com.nullbeans.persistence.models.Car"}

{"_id":"5ca763446598432d3ccf2013",
"brand":"Fiat",
"year":"2012",
"model":"Abarth 595",
"horsePower":140,
"_class":"com.nullbeans.persistence.models.Car"}

{"_id":"5ca763446598432d3ccf2014",
"brand":"Fiat",
"year":"2007",
"model":"Abarth 500",
"horsePower":135,
"_class":"com.nullbeans.persistence.models.Car"}
Summary
In this tutorial, we have created a simple Spring boot application that interacts with a MongoDB. We have configured the application to connect and authenticate to the database by configuring the connection URI and by configuring individual connectivity parameters. We then proceeded to create an entity model and its corresponding repository. We then discussed the @EnableMongoRepositories annotation and we tested our application by creating and searching for data documents in our example entity / collection.
If you liked this tutorial then please make sure to subscribe to our twitter feed by clicking the follow button below 😉
Leave a Reply
You must be logged in to post a comment.