In this tutorial, we will build a simple Spring boot 2 application with access to a Postgres database using JPA.
Background:
Before we get started, let us get a couple of definitions out of the way.
What is JPA?
JPA stands for the “Java Persistence API”. It is a java specification that defines how data in a relational database can be managed on the Java platform.
What is Hibernate?
Hibernate ORM, commonly referred to as simply “Hibernate” is an implementation of the JPA specification. While it was common to directly use the Hibernate API, it is now recommended to use the JPA interface, with Hibernate as the underlying framework. One can think of JPA as the controls in a car and Hibernate as the engine.
What is Spring Data?
Spring data is a group of technologies from Spring that provide abstraction and utility frameworks that aim to facilitate data access configuration and reduce boilerplate code. More information can be found here .
Setting up the Spring-boot application
In our example, we will set up a Spring-boot application with a JPA/Postgres stack. In order to start, let us add the required dependencies. Note that the Spring-boot-starter-parent has been used as the parent project.
<dependencies>

		<dependency>
			<groupId>org.springframework.boot</groupId>
			<artifactId>spring-boot-starter-data-jpa</artifactId>
		</dependency>

		<dependency>
			<groupId>org.postgresql</groupId>
			<artifactId>postgresql</artifactId>
		</dependency>

		<dependency>
			<groupId>org.springframework.boot</groupId>
			<artifactId>spring-boot-starter-test</artifactId>
			<scope>test</scope>
		</dependency>

		<dependency>
			<groupId>org.springframework.boot</groupId>
			<artifactId>spring-boot-starter-logging</artifactId>
		</dependency>

	</dependencies>
Notice the first two dependencies in our list. The first one is the “spring-boot-starter-data-jpa”. Adding this dependency will automatically pull in the the Java-persistence library, Hibernate-core, Spring-data and the spring-boot-starter-jdbc. The second dependency “postgresql” will add the required Postgres driver and is required to be able to interact with the underlying Postgres database management system. If you are using another DBMS then you will need to add the dependency for the corresponding driver.
The next step is to configure the Spring boot application to access the Postgres database management system. To achieve this, we will set have to add the jdbc url, username, password and the hibernate.dll-auto property (more on that later) to the application.properties file. Again, the JDBC url is dependent on the DBMS used. No password was configured on our DB server, therefore it was left blank (don’t do this in a prod environment).
spring.datasource.url=jdbc:postgresql://localhost/nullbeansdemo
spring.datasource.username=postgres
spring.datasource.password=
spring.jpa.hibernate.ddl-auto=create
DDL stands for “Data Definition Language”. It is a programming language used to define database structures and schemas. The value of the spring.jpa.hibernate.ddl-auto property can be set to instruct Hibernate to create our database schema, to update it, validate it, or simply do nothing. In our example, we set the value to “create”. This means that on application start-up, Hibernate will check the data models that we have created, and it will attempt to create a database schema that matches these models. The advantage of doing so is that you do not need to main different sets of database creation scripts. If your application is deployed on different platforms with different database system vendors, then the benefit is greater, as you will not need to create the scripts for the different vendor systems. Of course this feature can be turned off by setting the value to “none”. In that case, you need to make sure that your database schema exists with the required database tables. More information about this setting can be found here
Setting up our first entity
Now that we got the application configuration out of the way, it is time to create our first persistence entity. In our example, we will create a “Bank account” entity. We will expand on that example in later articles. For now, our bank account entity will look as follows:
package com.nullbeans.persistence.models;

import javax.persistence.*;

@Entity
public class BankAccount {

    private long id;

    private int version;

    private String accountNumber;

    private boolean isActive;

    public BankAccount() {
    }

    @Id
    @GeneratedValue(strategy= GenerationType.AUTO)
    public long getId() {
        return id;
    }

    public void setId(long id) {
        this.id = id;
    }

    @Version
    public int getVersion() {
        return version;
    }

    public void setVersion(int version) {
        this.version = version;
    }

    public String getAccountNumber() {
        return accountNumber;
    }

    public void setAccountNumber(String accountNumber) {
        this.accountNumber = accountNumber;
    }

    public boolean isActive() {
        return isActive;
    }

    public void setActive(boolean active) {
        isActive = active;
    }

    @Override
    public String toString() {
        return "BankAccount{" +
                "id=" + id +
                ", version=" + version +
                ", accountNumber='" + accountNumber + '\'' +
                ", isActive=" + isActive +
                '}';
    }
}
Let us take a look at some of the annotations used in this class:
@Entity: Classes annotated with @Entity are considered persistent entity definitions. Usually this means that a class maps to a database table. This annotation is required as Hibernate scans model packages for classes with this annotation.
@Id: Specifies that the annotated variable will be considered the primary key of the entity.
@GeneratedValue: This annotation indicates that the given value is a generated one. In other words, the user should not set this value explicitly. It will be generated automatically. There are multiple strategies for generating primary keys, such as using values from a sequence, use an underlying table or letting the database decide how the values are created. For simplicity, we use “AUTO”, which means that Hibernate will decide how to generate the keys.
@Version: The version annotation indicates the version number of the given entity. Every time an instance of an entity is modified, the version of that instance is incremented. Version numbers start from 0.
Setting up the repository
Gone are the days where DAO’s were needed to be written and implemented, one interface, class and method at a time in order to have a way to access and manage data of a specific entity. With the Spring-Data CrudRepository interface, data access object implementation has been greatly simplified. All that is needed is to create an interface that implements the “CrudRepository” interface, and you are done.
package com.nullbeans.persistence.repositories;

import com.nullbeans.persistence.models.BankAccount;
import org.springframework.data.repository.CrudRepository;

import java.util.List;

public interface BankAccountRepository extends CrudRepository<BankAccount, Long> {

    List<BankAccount> findByAccountNumber(String accountNumber);

}
The BankAccountRepository simply needs to extend the CrudRepository interface, with the BankAccount class and Long ( the primary key class) as the typed parameters. By default, the CrudRepository interface provides convinience methods such as save, saveAll, findById, findall, delete, deleteAll, etc.. What if we need extra functionality, such as searching by the bank account number?. In this case, we simply needs to create a method with the name “findByAccountNumber”. Since we use the same variable name as defined in the entity class, Spring data can automatically figure out the search parameter and the search query.
Trying it out
Let us put everything together by trying out the Entity and the corresponding repository that we just created. For this, we will create a “CommandLineRunner” bean. This bean will run once we start up our Spring-boot application and it is a useful development feature when the whole application context needs to be started up and tested for a specific procedure. We will obtain the bank repository from the application context and attempt to perform some save/search operations.
package com.nullbeans;


import org.slf4j.Logger;
import org.slf4j.LoggerFactory;

import com.nullbeans.persistence.models.BankAccount;
import com.nullbeans.persistence.repositories.BankAccountRepository;
import org.springframework.boot.CommandLineRunner;
import org.springframework.boot.SpringApplication;
import org.springframework.boot.autoconfigure.SpringBootApplication;
import org.springframework.context.annotation.Bean;

@SpringBootApplication
public class NullbeansPersistenceApplication {

    private static final Logger log = LoggerFactory.getLogger(NullbeansPersistenceApplication.class);

	public static void main(String[] args) {
		SpringApplication.run(NullbeansPersistenceApplication.class, args);
	}


	@Bean
    public CommandLineRunner example1(BankAccountRepository bankAccountRepository){

	    return new CommandLineRunner() {
            @Override
            public void run(String... args) throws Exception {
                BankAccount bankAccount = new BankAccount();
                bankAccount.setAccountNumber("SAVINGS100");
                bankAccount.setActive(true);
                bankAccountRepository.save(bankAccount);

                BankAccount bankAccount1 = new BankAccount();
                bankAccount1.setAccountNumber("CREDIT101");
                bankAccount1.setActive(true);
                bankAccountRepository.save(bankAccount1);

                log.info("Saved the bank accounts successfully\r\n");

                log.info("Quering DB for bank accounts");
                for(BankAccount persistentAccount: bankAccountRepository.findAll()){
                    log.info("Found account: {}\r\n", persistentAccount);
                }

                log.info("Searching by bank account number");
                BankAccount searchResult = bankAccountRepository.findByAccountNumber("SAVINGS100").get(0);
                log.info("Found bank account: {}", searchResult);


            }
        };

    }
}
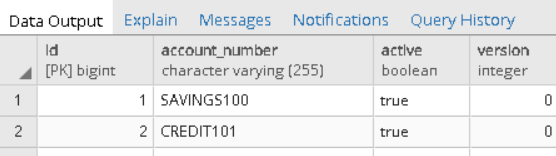
In our example, we created two bank accounts. Each bank account is saved using the repository’s save method. We will then use the find all method to get all the accounts in the database using the findall method. The final step is to use our additional search method by searching for a bank account using the account number. If we run the program about, we will get the following output:
2019-01-14 21:51:49.975  INFO 10292 --- [           main] j.LocalContainerEntityManagerFactoryBean :
Initialized JPA EntityManagerFactory for persistence unit 'default'
2019-01-14 21:51:50.658  INFO 10292 --- [           main] c.n.NullbeansPersistenceApplication      :
Started NullbeansPersistenceApplication in 5.523 seconds (JVM running for 6.361)
2019-01-14 21:51:50.751  INFO 10292 --- [           main] c.n.NullbeansPersistenceApplication      :
Saved the bank accounts successfully
2019-01-14 21:51:50.751  INFO 10292 --- [           main] c.n.NullbeansPersistenceApplication      :
Quering DB for bank accounts
2019-01-14 21:51:50.775  INFO 10292 --- [           main] o.h.h.i.QueryTranslatorFactoryInitiator  :
HHH000397: Using ASTQueryTranslatorFactory
2019-01-14 21:51:50.927  INFO 10292 --- [           main] c.n.NullbeansPersistenceApplication      :
Found account: BankAccount{id=1, version=0, accountNumber='SAVINGS100', isActive=true}
2019-01-14 21:51:50.928  INFO 10292 --- [           main] c.n.NullbeansPersistenceApplication      :
Found account: BankAccount{id=2, version=0, accountNumber='CREDIT101', isActive=true}
2019-01-14 21:51:50.928  INFO 10292 --- [           main] c.n.NullbeansPersistenceApplication      :
Searching by bank account number
2019-01-14 21:51:50.977  INFO 10292 --- [           main] c.n.NullbeansPersistenceApplication      :
Found bank account: BankAccount{id=1, version=0, accountNumber='SAVINGS100', isActive=true}
2019-01-14 21:51:50.981  INFO 10292 --- [       Thread-3] j.LocalContainerEntityManagerFactoryBean :
Closing JPA EntityManagerFactory for persistence unit 'default'
2019-01-14 21:51:50.984  INFO 10292 --- [       Thread-3] com.zaxxer.hikari.HikariDataSource       : HikariPool-1 - Shutdown initiated...
2019-01-14 21:51:50.988  INFO 10292 --- [       Thread-3] com.zaxxer.hikari.HikariDataSource       : HikariPool-1 - Shutdown completed.
As you can see, the repository was able to find the bank account using the account number successfully. The findall method was also able to find all our entities after they were saved. Note that if your application has multiple packages with JPA annotated entities, then Spring boot will automatically scan them. If you would like to scan specific packages only, then you can use the @EntityScan annotation.
EntityScan({"com.nullbeans.persistence.models"})
@SpringBootApplication
public class NullbeansPersistenceApplication {
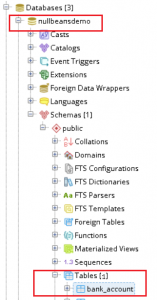
Now, let us take a quick look on the database side. We will see that Hibernate has automatically created our schema, and our data has been persisted.
Summary
In this tutorial, we explored how to get a Spring boot application with a JPA backend up and running. We added the required Spring JPA dependency and the required DBMS driver to our POM.xml. Then we added the required configurations to the application.properties file. We defined the persistence entity using JPA annotations and we created a Repository for accessing the data of that entity. Finally, we were able to test the application using a CommandLineRunner bean and we were able to confirm that the application was running as intended.