In this tutorial, we will discuss how to create a docker container from a Spring Boot application and how to run it in a Windows environment.
Most of the tutorials I encountered related to creating Spring Boot containers were focused on Linux, so I thought I would share my experience creating docker containers of your Spring boot applications, running them on Windows, and which difficulties you might experience while working in a Windows environment.
We will be using Windows 10 in this tutorial. You might be able to get Docker Desktop running on Windows 7, but for this, you will need to have Hyper-V enabled. This feature may not be available on all Windows 7 versions, so you might need to look for a workaround.
Installing Docker on Windows
To install Docker on Windows, you can download the Docker Desktop Community edition from the docker.com website. You might be asked to create an account in order to download the executable. However, we found the direct download link for version 2.1.0.2 here: https://docs.docker.com/docker-for-windows/release-notes/
For this tutorial, we will keep all the default settings that we see in the installer. There are some things that you might need to take care of when installing and running Docker on Windows.
Windows version and Hyper-V support
Hyper-V is a native hypervisor from Microsoft. This hypervisor can be enabled as a feature on select Windows versions only. For example, if you are running Windows 10, then you will need a Windows 10 Pro, Education or Enterprise editions to be able to enable the Hyper-V windows feature.
This feature is important for Docker version 2.x to run on Windows, and if not present, then Docker will refuse to install on your machine.
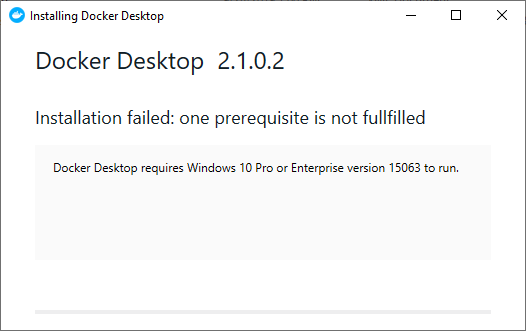
If you are facing this issue, then there are sadly only a handful of solutions. You may need to either upgrade your Windows edition, or you could opt to use an older 1.x version of the Docker toolbox. There have been a few workarounds mentioned around the web, which you could find easily by doing a Google search, however, they are a pain to implement.
Powershell Language Mode
Another issue that you might face is Powershell running in “Constrained Language” mode. In constrained mode, a script or a program has access to only a subset of the Powershell commands. On the other hand, “Full Langauge” mode enables you to run any Powershell command you like.
On certain machines, specially corporate computers, constrained mode is enabled by default, in order to protect computers from malware or any malicious software that attempts to use Powershell to perform an attack or to steal data.
However, this will cause a problem for Docker as it requires full language mode to run properly. You might encounter an error like this:
Unable to stop: Cannot invoke method. Method invocation is supported only on core types in this language mode.
at <ScriptBlock>, <No file>: line 86
   at Docker.Backend.HyperV.RunScript(String action, Dictionary`2 parameters) in C:\gopath\src\github.com\docker\pinata\win\src\Docker.Backend\HyperV.cs:line 177
   at Docker.Backend.ContainerEngine.Linux.DoStop() in C:\gopath\src\github.com\docker\pinata\win\src\Docker.Backend\ContainerEngine\Linux.cs:line 279
   at Docker.Backend.ContainerEngine.Linux.Restart(Settings settings, String daemonOptions) in C:\gopath\src\github.com\docker\pinata\win\src\Docker.Backend\ContainerEngine\Linux.cs:line 169
   at Docker.Core.Pipe.NamedPipeServer.<>c__DisplayClass9_0.<Register>b__0(Object[] parameters) in C:\gopath\src\github.com\docker\pinata\win\src\Docker.Core\pipe\NamedPipeServer.cs:line 47
   at Docker.Core.Pipe.NamedPipeServer.RunAction(String action, Object[] parameters) in C:\gopath\src\github.com\docker\pinata\win\src\Docker.Core\pipe\NamedPipeServer.cs:line 145
As of the time of writing of this article (Sep 28, 2019), the Powershell scripts that are used by Docker have are not signed. Therefore, Docker will not be able to run in constrained language mode.
Therefore, the solution is to run Docker in full language mode. You (or your corporate system administrator) will need to update the __PSLockdownPolicy environment variable or the registry value to 0 in order to enable full language mode.
Making sure Docker is running properly
Once you have Docker installed and running, you can make sure it is running properly by opening a Powershell Window and running the commands “docker version” and the “docker ps”.
The docker version command will indicate that Docker has been correctly installed, and the docker ps command will indicate that docker is running correctly running by listing the running docker containers. Do not worry if the list of running docker containers is empty.
If you have an output similar to the following, then you are ready to move on to the next section.
PS C:\Users\nullbeans> docker ps
CONTAINER ID        IMAGE               COMMAND             CREATED             STATUS              PORTS               NAMES

C:\Users\nullbeans> docker version
Client: Docker Engine - Community
 Version:           18.09.2
 API version:       1.39
 Go version:        go1.10.8
 Git commit:        6247962
 Built:             Sun Feb 10 04:12:31 2019
 OS/Arch:           windows/amd64
 Experimental:      false

Server: Docker Engine - Community
 Engine:
  Version:          18.09.2
  API version:      1.39 (minimum version 1.12)
  Go version:       go1.10.6
  Git commit:       6247962
  Built:            Sun Feb 10 04:13:06 2019
  OS/Arch:          linux/amd64
  Experimental:     false
About Docker images
Now that we have got all the Windows issues out of the way and having docker installed and running, we will need to create our Docker image. If you are just starting with Docker, then I recommend that you read about it more in order to better understand the architecture and to make more informed decisions about your applications.
With that in mind, let us discuss a few things that will make the next steps clearer.
Most Docker images require a base image
When creating a Docker image of your Spring boot or Java application, you will need to create it on top of an existing base image. A base image provides the “basics” that are required for your Java application to run. For example the base image openjdk:8-jdk-alpine will provide you with essential Linux/Unix OS repositories that allow a JVM to run, and a JDK 8 or JRE to actually run your Java application.
The Docker File
Once you have chosen the base image, you can configure the other parameters and settings that are required to run your application. Environment settings include storage volumes, environment variables, among others. Once you have defined these, you will then have to choose the Entry Point. This is the command which will run your application inside the Docker Container.
The base image, environment settings and the entry point can be defined in a file called the Docker File. The Docker file contains the definition of your container / image. The Docker File is also used to build your docker image which you can then upload to Docker Hub or to your local Docker environment.
Preparing our test Spring Boot application
In order to demonstrate how to containerize a Spring Boot application, we will create a tiny Spring boot application with a REST Service which can be called from the browser for demonstration purposes.
First, let us start by creating a tiny Spring boot application. You can start up a new Spring boot project by using start.spring.io. You can also check the full source code from the github link at the end of thus tutorial.
We will create our pom.xml with the following parent and properties.
<project xmlns="http://maven.apache.org/POM/4.0.0" xmlns:xsi="http://www.w3.org/2001/XMLSchema-instance"
	xsi:schemaLocation="http://maven.apache.org/POM/4.0.0 https://maven.apache.org/xsd/maven-4.0.0.xsd">
	<modelVersion>4.0.0</modelVersion>
	<parent>
		<groupId>org.springframework.boot</groupId>
		<artifactId>spring-boot-starter-parent</artifactId>
		<version>2.1.8.RELEASE</version>
		<relativePath/> <!-- lookup parent from repository -->
	</parent>
	<groupId>com.nullbeans</groupId>
	<artifactId>nullbeansdockerdemo</artifactId>
	<version>0.0.1-SNAPSHOT</version>
	<name>dockerdemo</name>
	<description>Docker tutorial on Windows OS, by nullbeans.com</description>

	<properties>
		<java.version>11</java.version>
		<docker.image.prefix>nullbeans</docker.image.prefix>
	</properties>
Notice that we added the property docker.image.prefix. This property will be used later to upload our Docker image to the local Docker server. For now, let us add the required dependencies in order to create a REST application
<dependencies>
		<dependency>
			<groupId>org.springframework.boot</groupId>
			<artifactId>spring-boot-starter-web</artifactId>
		</dependency>

		<dependency>
			<groupId>org.springframework.boot</groupId>
			<artifactId>spring-boot-starter-test</artifactId>
			<scope>test</scope>
		</dependency>
	</dependencies>
In the Java source folder of our project, there exists two classes. One will be the main application class and the other is our demo REST service.
package com.nullbeans.dockerdemo;

import org.springframework.boot.SpringApplication;
import org.springframework.boot.autoconfigure.SpringBootApplication;

@SpringBootApplication
public class DockerdemoApplication {

	public static void main(String[] args) {
		SpringApplication.run(DockerdemoApplication.class, args);
	}

}
And here is our demo controller.
package com.nullbeans.dockerdemo;

import org.springframework.web.bind.annotation.GetMapping;
import org.springframework.web.bind.annotation.RequestMapping;
import org.springframework.web.bind.annotation.RestController;

@RestController
@RequestMapping("myservice")
public class MyRestServiceController {

    @GetMapping("test")
    public String test(){
        return "Hello from docker";
    }


}
Preparing the Dockerfile
Now that we have our demo application ready, we will need to create a dockerfile to define our image. Since our example uses Java 11, we will use the Amazon Corretto 11 docker image, which is based on Amazon Linux. If your application requires Java version 8, then you can use openjdk:8-jdk-alpine which is based on Alpine linux. Please make sure to research the proper Docker image before you deploy your application to a critical or a production environment.
Let us create the following file in the project’s root folder. The file is simply called “dockerfile”.
FROM amazoncorretto:11.0.4
VOLUME /tmp
ARG JAR_FILE
COPY ${JAR_FILE} nullbeansdockerdemo.jar
ENTRYPOINT ["java","-Djava.security.egd=file:/dev/./urandom","-jar","/nullbeansdockerdemo.jar"]
Let us discuss the docker file line by line in order to understand what is going on.
- FROM: This command is used to define the base image that we will select for our Docker container. In this case, we will use the image tag 11.0.4 from the docker repository called amazoncorretto.
- VOLUME: This will create a “volume” or partition in our docker container environment called /tmp. This is often required for tomcat based Spring application in order to persist data on the filesystem.
- ARG: Defines an argument variable that will be available during the container building stage. After the image has been build, ARG variables are no longer accessible. The value of this argument will be set from our pom.xml file as we will see in the next section.
- COPY: This command simply copies a file from source to destination.
- ENTRYPOINT: As mentioned previously, this command will be used to run our JAR file. In our example, we run the file JAR which we “simply” renamed to nullbeansdockerdemo.jar along with some other jvm arguments.
Adding the required plugins
The last step we need to complete the docker image definition is to add the dockerfile-maven-plugin. This plugin will be used to pass the docker build argument “JAR_FILE” value which we saw in the previous section. We will also use it to define the local repository and image names with which our image will be uploaded.
The build section of our pom.xml file should look similar to this.
<build>
		<plugins>
			<plugin>
				<groupId>org.springframework.boot</groupId>
				<artifactId>spring-boot-maven-plugin</artifactId>
			</plugin>
			<plugin>
				<groupId>com.spotify</groupId>
				<artifactId>dockerfile-maven-plugin</artifactId>
				<version>1.4.12</version>
				<configuration>
					<repository>${docker.image.prefix}/${project.artifactId}</repository>
					<buildArgs>
						<JAR_FILE>target/${project.build.finalName}.jar</JAR_FILE>
					</buildArgs>
				</configuration>
			</plugin>
		</plugins>
	</build>
Our application will be uploaded into the repository nullbeans with the name nullbeansdockerdemo as stated in the repository tag in the dockerfile-maven-plugin configuration. Since we did not define any versioning, our application will be called the “latest” version in our local docker server.
Building and running the Spring boot Docker image
Now that we have everything set in place, all we have to do is to build and run our docker image. You can simply build the docker image using the following command.
mvn install dockerfile:build
This will download the base docker image you will use for your Spring boot image, and will create and upload your image to your local docker server. Please note that it might take a few minutes to download the base image the first time you build your container image.
Once this is done, you can start up your image by using the docker run command. Since Spring boot will automatically choose port 8080 as the default server port, we will have to expose this port to the host system in order to be able to access our demo docker app. We will tell docker to expose port 8080 of the container to port 8081 of the host system (You can still use port 8080 in the host system, but we chose port 8081 for demonstration purposes).
In order to run the our docker image, we can issue the following command in Powershell.
docker run -p 8081:8080 -t nullbeans/nullbeansdockerdemo
If everything was configured correctly, you will see an output similar to this.
  .   ____          _            __ _ _
 /\\ / ___'_ __ _ _(_)_ __  __ _ \ \ \ \
( ( )\___ | '_ | '_| | '_ \/ _` | \ \ \ \
 \\/  ___)| |_)| | | | | || (_| |  ) ) ) )
  '  |____| .__|_| |_|_| |_\__, | / / / /
 =========|_|==============|___/=/_/_/_/
 :: Spring Boot ::        (v2.1.8.RELEASE)

2019-09-29 11:59:52.872  INFO 1 --- [           main] c.n.dockerdemo.DockerdemoApplication     : Starting DockerdemoApplication v0.0.1-SNAPSHOT on c589e4e624cc with PID 1 (/nullbeansdockerdemo.jar started by root in /)
2019-09-29 11:59:52.880  INFO 1 --- [           main] c.n.dockerdemo.DockerdemoApplication     : No active profile set, falling back to default profiles: default
2019-09-29 11:59:54.082  INFO 1 --- [           main] o.s.b.w.embedded.tomcat.TomcatWebServer  : Tomcat initialized with port(s): 8080 (http)
2019-09-29 11:59:54.114  INFO 1 --- [           main] o.apache.catalina.core.StandardService   : Starting service [Tomcat]
2019-09-29 11:59:54.115  INFO 1 --- [           main] org.apache.catalina.core.StandardEngine  : Starting Servlet engine: [Apache Tomcat/9.0.24]
2019-09-29 11:59:54.221  INFO 1 --- [           main] o.a.c.c.C.[Tomcat].[localhost].[/]       : Initializing Spring embedded WebApplicationContext
2019-09-29 11:59:54.221  INFO 1 --- [           main] o.s.web.context.ContextLoader            : Root WebApplicationContext: initialization completed in 1239 ms
2019-09-29 11:59:54.484  INFO 1 --- [           main] o.s.s.concurrent.ThreadPoolTaskExecutor  : Initializing ExecutorService 'applicationTaskExecutor'
2019-09-29 11:59:54.705  INFO 1 --- [           main] o.s.b.w.embedded.tomcat.TomcatWebServer  : Tomcat started on port(s): 8080 (http) with context path ''
2019-09-29 11:59:54.711  INFO 1 --- [           main] c.n.dockerdemo.DockerdemoApplication     : Started DockerdemoApplication in 2.475 seconds (JVM running for 3.034)
2019-09-29 11:59:59.280  INFO 1 --- [nio-8080-exec-1] o.a.c.c.C.[Tomcat].[localhost].[/]       : Initializing Spring DispatcherServlet 'dispatcherServlet'
2019-09-29 11:59:59.283  INFO 1 --- [nio-8080-exec-1] o.s.web.servlet.DispatcherServlet        : Initializing Servlet 'dispatcherServlet'
2019-09-29 11:59:59.310  INFO 1 --- [nio-8080-exec-1] o.s.web.servlet.DispatcherServlet        : Completed initialization in 27 ms
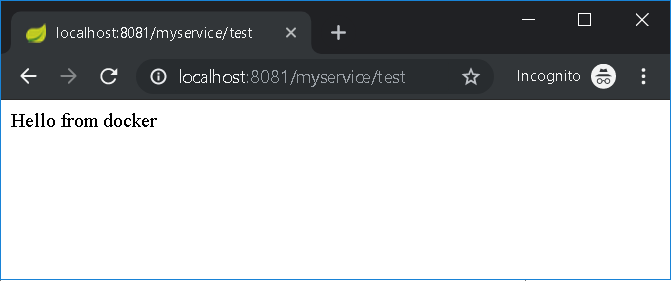
Now, let us test our rest service by going to the browser and inserting the following link: localhost:8081/myservice/test
You should be able to see the response as follows.
To stop the docker container, you can use the docker stop command. Note that this may not be the most graceful shutdown procedure for Spring boot application.
To stop the container, you will need to obtain the container ID first by using the docker ps command. You can then stop the container by issuing the docker stop <container ID> command.
PS C:\Users\nullbeans> docker ps
CONTAINER ID        IMAGE                           COMMAND                  CREATED             STATUS              PORTS                    NAMES
b30b217308ec        nullbeans/nullbeansdockerdemo   "java -Djava.securit…"   10 minutes ago      Up 9 minutes        0.0.0.0:8081->8080/tcp   hardcore_hawking
PS C:\Users\nullbeans> docker stop b30b217308ec
b30b217308ec
PS C:\Users\nullbeans>
Summary
In this tutorial, we discussed how to containerize a Spring boot application and run the created docker image in a Windows environment. The full source code of this tutorial can found here: https://github.com/nullbeans/docker
If you have liked this tutorial or if you have any questions, then please let us know in the comments below. And make sure to follow us on twitter to be notified of the latest articles that we publish 😉
Leave a Reply
You must be logged in to post a comment.