
Freemarker is a powerful Java template engine. It can be used to generate basically anything, from HTML pages, configuration files, e-mails, or anything else. All you need to do is define your template, use Java to prepare the data, and use the Freemarker engine to process your data with the given template to produce the output you need.
This tutorial will focus on how to configure Freemarker on a Spring Boot 2 application. We will use a simple Freemarker template to keep our example as easy as possible.
Adding the required dependencies
We will use Maven as our dependency management engine in this example. Spring Boot provides a convenient way to add the needed Freemarker dependencies. All we need to do is to import the “spring-boot-starter-freemarker” in our Pom.xml as shown below:
<dependency>
<groupId>org.springframework.boot</groupId>
<artifactId>spring-boot-starter-freemarker</artifactId>
</dependency>
If your project does not have the Spring-boot-starter-parent as the parent project, then just add a dependency for the Freemarker library directly.
<dependency>
<groupId>org.freemarker</groupId>
<artifactId>freemarker</artifactId>
<version>2.3.28</version>
</dependency>
Preparing the FTL template and data structure
For our example, we will use a simple POJO data structure to transfer the data to the Freemarker template.
package com.nullbeans.persistence.models;

public class Post {

private long id;

private String title;

private String description;

private String content;

public String getTitle() {
return title;
}

public void setTitle(String title) {
this.title = title;
}

public String getDescription() {
return description;
}

public void setDescription(String description) {
this.description = description;
}

public String getContent() {
return content;
}

public void setContent(String content) {
this.content = content;
}

}
We would also need to create an ftl template to process our Post objects. In this example we will create a very simple ftl file that will be used to generate html outputs. The ftl file looks a lot like an html file.
<!DOCTYPE html>
<html>
<head>
<title>Home page</title>
<meta charset="UTF-8">
</head>
<body>
<h1>${post.title}</h1>

<i>${post.description}</i>

<p>${post.content}</p>
</body>
</html>
Here, post.title, post.description and post.content refer to the inner members of a post object. In this example, we will call the file “blogpost.ftl” and place it in our application’s resources folder, in a new folder called templates.
src / main / resources / templates / blogpost.ftl
Configuring Freemarker using the FreeMarkerConfigurer
The next step would be to tell FreeMarker where our templates are located. The FreeMarkerConfigurer is a configuration bean from Spring used to configure different settings of Freemarker. These settings include the default location of the .ftl templates, the default file encoding format and lots among many others. For this, let us create a configuration class called “BeansConfig” where we define our FreeMarkerConfigurer:
package com.nullbeans.nullbeansserver.config;

import com.nullbeans.nullbeansserver.freemarker.FreemarkerTemplateWriter;
import org.slf4j.Logger;
import org.slf4j.LoggerFactory;
import org.springframework.context.annotation.Bean;
import org.springframework.context.annotation.Configuration;
import org.springframework.web.servlet.view.freemarker.FreeMarkerConfigurer;

@Configuration
public class BeansConfig {

private final static Logger logger = LoggerFactory.getLogger(BeansConfig.class);

@Bean
public FreeMarkerConfigurer freeMarkerConfigurer(){
FreeMarkerConfigurer freeMarkerConfigurer = new FreeMarkerConfigurer();
freeMarkerConfigurer.setTemplateLoaderPath("classpath:/templates"); //defines the classpath location of the freemarker templates
freeMarkerConfigurer.setDefaultEncoding("UTF-8"); // Default encoding of the template files
return freeMarkerConfigurer;
}

@Bean
public FreemarkerTemplateWriter freemarkerTemplateWriter(){
return new FreemarkerTemplateWriter();
}

}
In our example, we pick up the templates from the classpath. It is of course possible to pick up the templates from a specific location in the filesystem instead. That may be more convenient in a production environment as we wouldn’t need to rebuild and re-start our Spring boot application just for making modifications in the templates.
If you would like to learn more about how to configure Spring beans, then please check out our post here
Processing templates and writing the output
As you may have noticed, we defined another bean called the “FreemarkerTemplateWriter”. This is a custom bean which we created for our application to convert a “Post” object into an html file using Freemarker.
package com.nullbeans.nullbeansserver.freemarker;

import com.nullbeans.persistence.models.Post;
import freemarker.template.Template;
import org.slf4j.Logger;
import org.slf4j.LoggerFactory;
import org.springframework.beans.factory.annotation.Autowired;
import org.springframework.web.servlet.view.freemarker.FreeMarkerConfigurer;

import java.io.*;
import java.nio.charset.StandardCharsets;
import java.util.HashMap;
import java.util.Map;

public class FreemarkerTemplateWriter {

private static final Logger logger = LoggerFactory.getLogger(FreemarkerTemplateWriter.class);

@Autowired
private FreeMarkerConfigurer freeMarkerConfigurer;

public void writeHtmlBlogPostFile(Post post){

Map<String, Object> data = new HashMap<>();
data.put("post", post);

File page = new File(post.getTitle() + ".html");

try(Writer pageWriter = new OutputStreamWriter(new FileOutputStream(page), StandardCharsets.UTF_8)) {
Template template = freeMarkerConfigurer.getConfiguration().getTemplate("blogpost.ftl");
template.process(data, pageWriter);
logger.info("Writing of html file completed successfully!");
}catch(Exception e) {
logger.error("File writing using the Freemarker template engine failed!", e);
}

}

}
The Freemarker template engine can be fed with data using Java maps. Here, we create a HashMap and we insert a post object that is accessible with the key “post”. In the template .ftl files, we need to make sure that we access objects using their key in the map. Therefore, we used “${post.content}” to access the content member of the post object.
We also used a FileOutputStream and an OutputStreamWriter to write the output. However, the output can be directed to any type of Writer, depending on the purpose of the application.
Some might argue that the OutputStreamWriter is outdated and we should use the new Writers from Java.NIO. However, as of JDK 8, there is no way of explicitly specifying the charset of a an NIO FileWriter. If this is not done, then Java will just use whatever charset it detects on your operating system. This might cause issues with non-ASCII characters displaying incorrectly in the resulting html files. Here we configured the OutputStreamWriter with the UTF-8 Charset.
Notice how we used the freeMarkerConfigurer bean to get our “blogpost.ftl” template. We need to go through the configuration in order to obtain the required template. Once we have it, we can call the template.process method in order to process the template with the given data.
Our program will write a new html file with the post title as the file’s name. The whole process can be summarized in the following diagram:
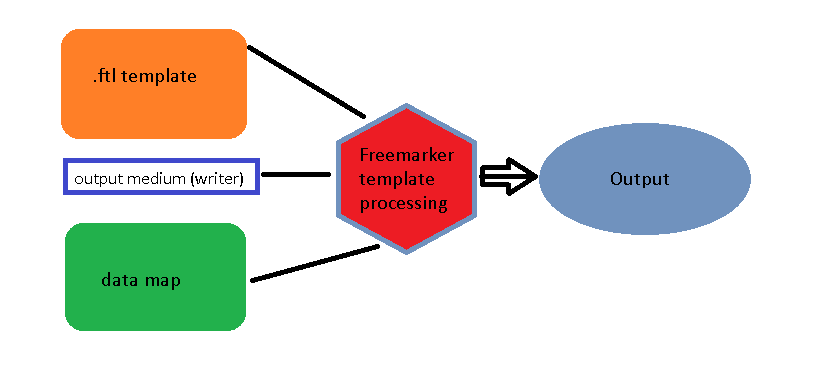
Click to enlarge
Let us try out our program by triggering the FreemarkerTemplateWriter bean. We will call the bean directly within the main method for testing purposes (please do not do this in production 😉 )
package com.nullbeans.nullbeansserver;
import com.nullbeans.nullbeansserver.config.BeansConfig;
import com.nullbeans.nullbeansserver.freemarker.FreemarkerTemplateWriter;
import com.nullbeans.persistence.models.Post;
import org.springframework.boot.SpringApplication;
import org.springframework.boot.autoconfigure.SpringBootApplication;
import org.springframework.context.ApplicationContext;
import org.springframework.context.annotation.Import;
@Import(BeansConfig.class)
@SpringBootApplication
public class NullbeansserverApplication {
public static void main(String[] args) {
ApplicationContext context = SpringApplication.run(NullbeansserverApplication.class, args);
Post post = new Post();
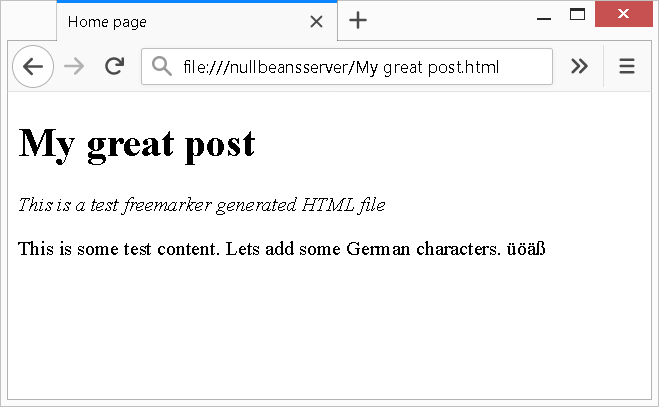
post.setTitle("My great post");
post.setDescription("This is a test freemarker generated HTML file");
post.setContent("This is some test content. Lets add some German characters. üöäß");
context.getBean(FreemarkerTemplateWriter.class).writeHtmlBlogPostFile(post);
}
}Building and running this program will result in the creation of a file called “My great post.html”.
<!DOCTYPE html>
<html>
<head>
<title>Home page</title>
<meta charset="UTF-8">
</head>
<body>
<h1>My great post</h1>

<i>This is a test freemarker generated HTML file</i>

<p>This is some test content. Lets add some German characters. üöäß</p>
</body>
</html>
Conclusions
Our example is a simple illustration of what could be done with Freemarker and Spring. The output can be directed to a network stream and the data could be obtained from the database. Or the generated html files could be used in a Spring web MVC application for displaying database or other contents. This example is just a starting point for a really powerful framework.
If you like this content, then please support us by clicking that twitter follow button at the bottom of the page in order to be notified of our latest updates 😉