
Is your laptop running slow? Maybe it is outdated and needs an upgrade? In this post, we will discuss some ways that can improve your laptop’s performance and hopefully you can squeeze in a year or two of usability before needing to buy a new one.
Identify the performance bottleneck
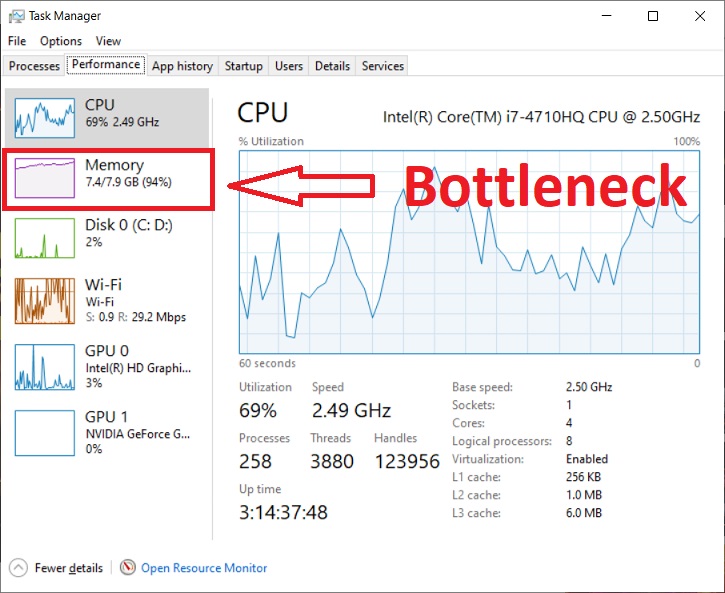
Before you start performing upgrades on your laptop, you will need to identify your bottleneck. The bottleneck is the component on your machine which slows it down the most.
An easy way to find out the bottleneck is to check the system resources utilization when your computer is acting slow. On Windows, this can be easily done by pressing CTR + Shift + ESC. This will open up your Task Manager. You can then check the “Performance” tab and see which resources are closer to 100% utilization.
In the next sections, we will explore options which you could use to improve the performance of each of your system resources.
Improving CPU and GPU performance
If you have a really old (or rare) laptop, then you could technically buy a newer CPU or GPU to replace the old one. Just make sure that you buy one that is compatible with the CPU or GPU socket that you have and your motherboard. However, most modern laptops now have the CPU and GPU soldered onto the motherboard.
This is done for multiple reasons. For example, to save socket space inside the laptop case, making it thinner. Another reason is that having the internal components soldered makes them harder to get out of place. This is a very important property for a laptop, as a small bump or knock can move your laptop’s internal components around. You don’t want that happening to the processing chips.
However, we still have a few options to improve the CPU’s performance. So lets get started.
Removing dust from your laptop
Cleaning up your laptop internally and on regular basis is not only good for performance, but also for the longevity of your laptop components.
When the inside of your laptop becomes dusty, it is easy for the internal components to get too hot. Especially for the CPU and the GPU as these components produce the highest amount of heat. This is because the ventilation system (AKA the heat sink and the fan) is unable to remove heat adequately due to all the dust that has built up.
When the temperature gets too hot, the computer tries to protect these components from burning out, so two things happen. First, the CPU or GPU slows itself down in a process called throttling. This happens in order to reduce the amount of heat produced.
The second option is to shutdown completely. This usually happens when the temperature reaches a dangerous level. Usually your computer will fail to turn on until the temperature reaches a manageable level.
In order to clean up your laptop, we recommend the following steps:
- Disassemble your laptop for cleanup. If you are not sure how to do that, then Google is your friend. You usually find a disassembly guide for most laptops on ifixit.com along with pictures.
- Use a small brush to remove dust from the insides of the laptop.
- A can of compressed air from Amazon will come in handy to clean up the insides of parts and components which are difficult to reach with a brush.
Replacing the thermal paste

![]()
If you cleaned up your laptop and made sure that it is free of dust, but still experience thermal throttling, then you will probably need to replace the thermal paste between the laptop’s heat-sink and the GPU and CPU.
With time, the thermal paste dries, ages and stops conducting heat as good as it used to. This causes the internal components to overheat as thermal energy is not removed as quickly as before. This is specially true for factory applied thermal paste as manufacturers usually try to reduce costs by applying lower quality paste.
We advise that you perform the following steps in order to replace the thermal paste.
- First, you will need to disassemble the laptop and remove the heat sink.
- Then you will need to completely remove the old thermal paste from both the heat sink and the CPU and GPU chips. Do not skip this step. Otherwise, your application of the new past will mix with the old paste. This not only could cause tiny bubbles to form between the old and new pastes, but also reduce the thermal conductivity and even damage your chip. I personally used the ArctiClean kit to remove the old paste. It is both cheap and does a good job. You can use a cotton swab or even better, something which doesn’t have small fibers coming out of it. Make sure that whatever you use doesn’t leave any fibers, strings, etc on the chip.
- Now, it is time to apply the new paste. Make sure that you pick a high quality one. I have previously used the MX-4 thermal paste from ARCTIC because of it’s durability and very reasonable price. I recommend that you check some Youtube videos to see how to apply the new paste and how much quantity is appropriate as these are both important for the success of the operation.
If you feel that applying a new paste is a complicated step, then check out the next section.
Using a cooling Graphite Thermal Pad

For those who have difficulty applying thermal paste, or do not know how much to apply, or how, there is now an alternative.
You can use a graphite thermal pad such as ![]() this one from Innovation Cooling (click to check the price on Amazon) . The idea is simple, instead of applying a paste, you insert this pad between your GPU/CPU and the heat sink. Graphite is a thermal conductor, which makes it ideal for such applications.
this one from Innovation Cooling (click to check the price on Amazon) . The idea is simple, instead of applying a paste, you insert this pad between your GPU/CPU and the heat sink. Graphite is a thermal conductor, which makes it ideal for such applications.
The only thing you will need to consider is the size of the pad. Users reported very good performance from the pad, so if you do not want to go the thermal paste way, then this is for you.
Note that you will still need to clean up the heat sink and the chips before applying the pads. Also note that graphite is not just thermally conductive, but also electrically. Which means that you will need to fit the pad exactly to the chip. Otherwise, you might short circuit and kill some components on your motherboard.
Replace the laptop fan

If you are still experiencing thermal throttling even after applying the new thermal paste, then there are two possibilities. Either your laptop’s design causes it to easily overheat, or that your laptop fan is starting giving out.
If you previously didn’t experience thermal throttling, but are doing so now, then there is a good chance that your laptop fan is not performing well.
Laptop fans are one of the most vulnerable components as it is a moving part. Moving parts experience wear and tear more than other components. If you suspect that the fan is failing, then it is urgent to replace it. If your fan unexpectedly fails while gaming or performing an intensive task, there is a decent chance to damage your CPU or GPU chips.
We cannot give out recommendations for which fan to use, as it will depend on your laptop. You will need to do your research to find out one that is compatible with your laptop.
For example, this one seems to be compatible with many HP laptop models, while that one is compatible with some Lenovo models.
Overclocking
Now we start to dive into deeper waters. If you have made sure that your laptop is both cleaned up and not experiencing thermal throttling, then we will need to acknowledge the point that your CPU or GPU has become outdated for newer software.
However, we still have a few tricks up our sleeves 😉 .
One option to consider doing is overclocking your CPU or GPU chips. Overclocking is the process of increasing the clock speed or clock frequency of a component beyond it’s factory settings. For example, if your CPU was marketed as a 2.5 GHz chip, you can make it run faster by overclocking it to 2.6 – 2.7 GHz.
There are a few things that limit the amount of overclocking that you could do.
- Thermal energy removal rate: When you overclock components, they produce more heat. This causes them to throttle, making the chip overall slower. The trick is to find the sweet spot, where you increase the clock speed as much as possible while not reaching the temperature threshold.
- Stability: The higher you go with the clock speed beyond the factory settings, the less stable a component becomes. This is usually a component and design limitation. You can usually improve stability by increasing the voltage supplied to the chip. However, more voltage means more heat so you will need to be careful with that.
- Warranty: Manufactures usually discourage users to play around with the component’s voltage and clock frequency. This is because it is a risky operation, if done to an extreme. So you will need to take this into consideration before attempting to overclock your chips.
We will not write an extensive over clocking guide here, as this is a lengthy topic and will depend on your CPU and GPU models, but it is for sure an option if you would like to squeeze out more performance from your machine.
We recommend you perform overclocking in combination with other steps mentioned in this guide, such as cleaning up laptop dust, applying thermal paste, using a laptop cooling pad as in the next section and using liquid metal as we will see later. This is because your laptop will be more likely to deal with the extra heat produced by overclocking.
Using a laptop cooling pad

Using a laptop cooling pad ![]() such as the TopMate TM-3 is another way you can reduce the thermal load on your CPU and GPU, which in turn reduces the thermal throttling periods, allowing your computer to run more smoothly.
such as the TopMate TM-3 is another way you can reduce the thermal load on your CPU and GPU, which in turn reduces the thermal throttling periods, allowing your computer to run more smoothly.
Sometimes, laptops can overheat by design, due to the small, thin case that all those laptop components are squeezed in. So giving your internal laptop fan some extra help can make a difference.
It is also a cost effective way to increase the thermal capacity of your machine, allowing you to perform more overclocking.
Using liquid metal

![]()
Now we will dive into very deep waters, and let me warn you that this step is very risky. However, with high risk, comes high reward.
This step is exactly the same as the replacement of the thermal paste step. Except that instead of replacing the thermal with normal thermal paste, we will replace it with a Liquid metal paste.
Liquid metal conducts heat much more efficiently than thermal paste because it is made of metallic compounds. This makes it very ideal if you want your laptop to stop throttling or to greatly improve your overclocking potential.
However, as we learned in school, metal conducts both heat and electricity. This is where the risky part comes in. If you apply too much liquid metal, or if you accidentally drop some on other electronic components in the motherboard, you will cause a short circuit and kill your laptop. You have been warned!
If you are feeling adventurous, and would like to have that thermal capacity boost, then you can check out Alphacool 12879 Eisfrost Xtreme Liquid Metall Paste or this one from Thermal Grizzly
Replacing your Hard drive with an SSD

![]()
If you notice that loading anything takes ages, and your laptop’s performance is very bad during video streaming, or when saving/loading files, then there is a big chance your hard drive is either getting old, or is just too slow for today’s applications.
Aside from the usual software oriented options such as defragmenting your drive and making sure your laptop is not overloaded with malware, there is not much that you could do with an existing drive to make it faster.
Usually, mechanical hard drives are one of the first components to age in a laptop as it contains moving parts. Over the years, the drive’s performance degrades and it eventually dies with wear and tear.
Therefore, it may be worth to replace the drive with an SSD if you have a traditional HDD.
Solid State Disks (SSDs) are orders of magnitude faster than traditional mechanical drives as they do not contain moving parts. Replacing your mechanical drive with an SSD will will cause a night and day performance difference in your laptop.
Previously, SSDs used to be very expensive, which caused people to stick to the traditional mechanical drive, but not anymore. You can now find a 250 GB SSD for under $70.
Lately, I needed to exchange my laptop’s hard drive as it was getting to slow for running a browser, music, and my software development software at the same time. My disk utilization was constantly at a 100%. Therefore, I picked up Samsung SSD 860 EVO 1TB .
You can also pick up the smaller and much cheaper Samsung SSD 860 EVO 250GB version. If you would like to be cost effective, you can have your operating system and your games installed on the smaller SSD, while having things like documents, music and movies stored on an external, traditional mechanical disk.
However, before buying a new drive, you should perform the following steps.
- Make sure that your laptop is compatible with the new drive. Most laptops use a SATA III interface.
- Make sure that the new drive fits inside your laptop. You can check the dimensions of your current drive and compare them to your new one.
From there you have two options, either to clone your existing drive onto the new one, or to have a fresh installation on the new drive, and just copy what you need from the old one.
For both cases, you will need a SATA to USB interface in order to run the operating system from one drive, and read the files and data from the other drive.
Increasing the RAM capacity

![]()
This option might be worth considering if you usually have your RAM filled to 90% capacity or more.
When your RAM usage reaches a critical level, your operating system will still need to save the “hot memory”, or the memory that the applications are currently using somewhere. When it runs out of RAM space, it moves on to the larger but much slower disk space.
Since disk memory is much much slower than Random Access Memory (RAM), the applications have to work with disk memory, which causes your laptop to take a huge performance penalty. Not only those applications will run very slow, but also your disk I/O utilization goes through the roof, causing your laptop to slow down even further.
You will notice such behavior if you try to start 20 browser tabs at the same time, with each tab running a memory intensive task, like video streaming.
If your performance issue arises from having too many running applications at the same time, then adding more memory can be a very cost effective solution to this problem.
I have used memory from Crucial in other hardware builds, and I have been very satisfied. So something like this 16GB DDR4 set from Crucial fits the bill nicely.
When it comes to RAM upgrades and older laptops, capacity trumps speed. For example, I would choose a large 32GB set of 2400 MT/s than a 16GB 3200 MT/s. This is because your older laptop is highly unlikely to take advantage of the high number of transactions per second. However, it is more likely that you can take advantage of the higher RAM capacity as it will save you laptop from throttling on RAM capacity and subsequently disk I/O.
As usual with any hardware replacement, please make sure that your laptop will be compatible with the newer parts.
Summary
In this post, we discussed a few affordable options for improving and upgrading your laptop, without having to invest $100s of dollars.
Most of the options discussed have been hardware oriented. If you would to see a software performance tuning guide then please let us know in the comments section 😉